PRiSM JavaScript App Tutorial – Part I
13 May 2021
Dr Christopher Melen (PRiSM Software Research Engineer)
Introduction
The past 10-or-so years has witnessed an enormous growth in interest in the use of JavaScript, not only as language for the web but also for building applications for the desktop, and mobile devices. For a server to be built using JavaScript is something commonplace and unremarkable in 2020, but which would have been unthinkable even 20 years ago. At that time JavaScript was still seen merely as a scripting language for websites built primarily with static HTML, a language most ‘serious’ programmers wouldn’t have considered worth their time. Today, however, JavaScript is consistently ranked among the top 5 languages used by programmers.
This tutorial aims to provide a brief introduction and tutorial to the process of building a JavaScript app, capable of being run on either the web or a native platform like iOS, with a special emphasis on building JavaScript audio applications. We will be learning about and using a number of the most prominent technologies in this area, including ReactJS, Parcel and the Web Audio API. The article may therefore be viewed as a general introduction to each of these technologies. The ultimate aim of the tutorial is that at the end of the tutorial you will have mastered not only the basics of programming in JavaScript for the web and native platforms, but also the technologies just mentioned.
Although no advanced programming knowledge is required for the tutorial, some programming experience is certainly assumed, either with JavaScript itself or a comparable language such as Python. Additionally, it is assumed the reader will be familiar with the basics of executing commands in the terminal.
What We’ll Be Building…
The app that we are aiming to develop is a slightly modified version of one of PRiSM’s own apps, the PRiSM Oscillator App (see the screenshot below). This is a simple app for generating and visualizing audio waveforms, targeting the primary mobile platforms – Apple’s iOS and Google’s Android – and is available for installation on any device supporting these operating systems (iPhone/iPad, or any Android device). The app was developed for use in composer Nina Whiteman’s project, Escape! It was designed to be simple and easy to use, with little to no configuration required, and with a clean, minimalist appearance. The full source code can be found on GitHub. In this tutorial we will focus mainly on duplicating the core functionality of this app – the generation and rendering of audio waveforms – with some added features enabling simple user interaction.
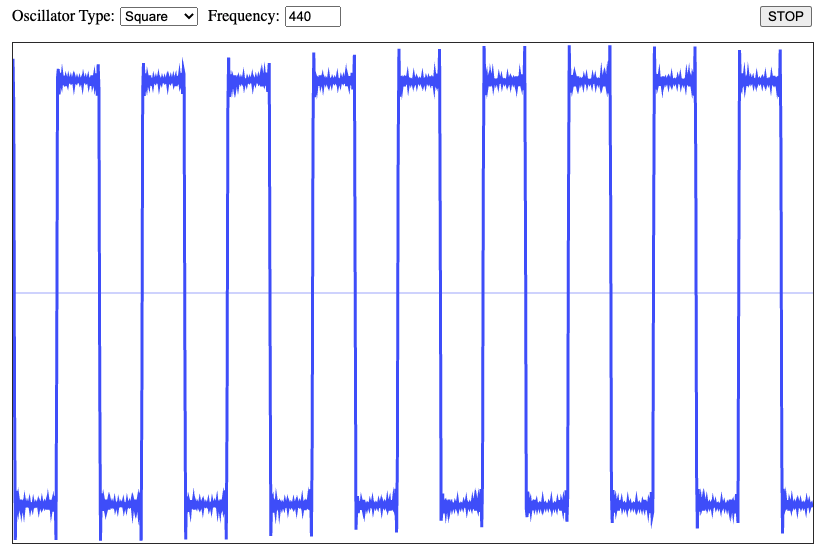
Figure 1: Oscillator App
Modern JavaScript Development
JavaScript emerged in the mid-1990s as a scripting language for the Netscape web browser. At that point it was known as LiveScript (the name change referencing Java came in 1995, when Java was released, but the two languages actually have little in common beyond their shared C-like syntax). By the end of the first decade of the present century JavaScript had begun to develop beyond its origins as a language for adding scripts inside web pages into something more sophisticated. This was thanks in large part to the release in 2009 of NodeJS, a JavaScript runtime environment which for the first time allowed programmers to easily develop JavaScript applications outside of the context of the web browser. JavaScript development began to resemble the kinds of practices seen in more ‘heavyweight’ languages used to build rich graphical UIs. Today JavaScript is capable of almost anything a more traditional language can do, including writing command line tools, and even servers and databases. It has moved beyond the web to be accepted as an excellent language for the development of rich native applications, as well as still supporting traditional web apps.
ReactJS
At the time of writing the most popular library for developing graphical JavaScript applications, whether for the web or native platforms, is ReactJS, originated and maintained by FaceBook. ReactJS (also known simply as ‘React’) stands as the inheritor of a long line of JavaScript UI development, beginning in the early 2010s with libraries like Backbone, which in turn built on top of earlier, lower-level libraries such as jQuery. This first generation of JavaScript UI libraries took concepts familiar from desktop application development, like MVC(Model-View-Controller) architecture, and adapted them to the web. It has been said (indeed this is mentioned on the React website) that React is ‘the V in MVC’. This is something of a misconception, however. React is more than simply a UI library, and encourages an entirely different way of thinking about app development, based on reusable UI components, which present data and manage state and user interaction in a self-contained fashion. It abstracts away much of the less palatable side of web programming, which in the past involved the direct manipulation of elements in a web page (‘the DOM’). Instead React uses a ‘Virtual DOM’, which allows for a simpler, declarative programming model, as well as greatly improved performance.
In this series of tutorials we will be building a React application from scratch. It is also possible to set up a React development environment using one of several integrated toolchains – for example the popular create-react-app, which automates much of what we will be building here by hand. Despite their convenience, such frameworks abstract away many essential aspects of the process of building a React-based application. If you are interested in learning about the process from the ground up, however – including those hidden parts – then this series of tutorials is perfectly suited to you.
JSX
In React we build applications out of components, defined as functions which return JSX, or JavaScript XML. JSX is identical to standard JavaScript, but extends its syntax with HTML-like tags which can be directly embedded into otherwise normal JavaScript code. For example:
const element = <h1>Hello, world!</h1>;
Although React doesn’t mandate the use of JSX, its use lies at the core of its declarative model. React converts JSX into lower-level JavaScript calls that create and update DOM elements. It abstracts this level away from us so we can concentrate on simply describing our UI, in the native language of the web (XML/HTML).
State Management
Even quite basic applications typically have some notion of state, that is, data (typically in the form of variables, properties or fields) that are stored by the application and whose values may change over time, influencing the app’s configuration, functionality, appearance, etc. In React class components have an in-built state object, which components can use to manage their own data:
class Clock extends React.Component {
  constructor(props) {
    super(props);
    this.state = {date: new Date()};
  }

  render() {
    return (
      <div>
        <h1>Hello, world!</h1>
        <h2>It is {this.state.date.toLocaleTimeString()}.</h2>
      </div>
    );
  }
}
If a change in the state occurs, say through some user interaction, React is notified and re-renders the component. Note that the state object should not be modified directly, but only through the setState( ) method (state in React is immutable, so setState() actually replaces the old state object with a new one containing the updates). State management of this kind was originally only available in class components, and functional components were referred to as ‘stateless’. With the recent introduction of React Hooks, however, state can now be used by both types of components. Although class components are still available in React, and there are no immediate plans to deprecate them, the accessibility of state management within functional components means that React developers can fully embrace functional programming style. In the spirit of this, all components within the project we are developing will be functional.
Props
In addition to updating in response to changes in internal state, React components can also respond to data coming from the outside environment, through props. Props (short for ‘properties’) are simply arguments passed into the component, typically from a parent component. They are read-only, and cannot be modified from within the component which receives them. Changes in the value of a prop received by the component will trigger a re-render, just as with changes in the component’s internal state (this applies to both class and functional components). Props don’t necessarily need to be used in this way, however. Indeed you can pass anything through a component’s props, not just data – for example functions, or even other components. Although they might not seem particularly revolutionary at first, props are in fact one of React’s most versatile and powerful features. We shall see just how useful they are in a future instalment of this series, when we come to add user interaction to our app.
Requirements
Before installing anything we first need to set up a folder structure to contain our code. Since our project will be fairly simple we won’t need a complicated layout of files and folders. We’re calling our project oscillator-app, so we’ll need a top-level directory with that name – you can go ahead and create the folder manually, or execute the following command:
mkdir oscillator-app
Inside this main directory we need a couple of sub-folders. We could in fact skip this step and maintain a flat folder structure, but sub-folders often help to organise our code, particularly when it grows beyond a few files. Create a sub-folder called src, which will contain most of the project’s JavaScript code, and another sub-folder called public, which will contain resources directly exposed to the web, such as HTML files, images, etc. Our final directory structure should look like this:
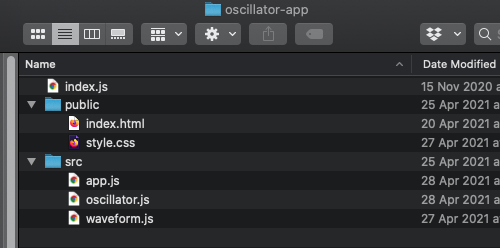
Figure 2: Oscillator App Folder Structure
We will also need to install some core tools, the most important of which are NodeJS and NPM. The latter is the Node Package Manager, which although part of NodeJS itself can be used independently of it to install JavaScript libraries. Once we have NPM installed we can run it at the command line to obtain the packages we need, either globally (i.e.: available from anywhere on the machine) or locally (i.e.: installed for just this project).
Before we can add any libraries to our project we first need to initialize it, so that NPM recognizes it as an NPM project. To do this, enter the project top level directory and execute the following:
npm init
Running this command will walk you through a short sequence of questions designed to set up some basic NPM configuration options for the project. If you examine the folder after completing the sequence you should see a new file present, called package.json. This is a file containing the configuration for the project, and should not be deleted (more information on the format of this file can be found here). Although we can modify it ourselves manually, when we install new libraries NPM will update it for us, so there is usually no need to edit it by hand.
Now we can start adding the libraries we need. First let’s install React:
npm install react react-dom --save
Notice that in the above command we actually installed two libraries, React itself but also its sister package ReactDOM, which allows React to render HTML. In addition you will notice the –save option, which just tells NPM to save them as ‘production’ libraries, rather than only for development (for the latter we would use –-save-dev).
After running npm install for the first time we will see a new folder called node_modules under our project folder. This is simply the place where NPM places the packages and libraries we install, so we shouldn’t move this folder, and certainly shouldn’t delete it! Also don’t be concerned if this folder gets quite big (it can often grow to multiple Gigabytes!), as much of what it contains will only be used during the development phase. And when using version control you should definitely avoid tracking this folder (add it to your .gitgnore).
The first run of npm install will also create a new file, package-lock.json. This is a companion to package.json, and stores an exact, and typically verbose, version of a project’s dependency tree. You don’t need to worry about this file, and you’ll never need to edit yourself (although if you are using version control you shouldcommit it).
Now that we have our core toolchain and main libraries set up we can move on to writing some code!
Building And Running The Project
Adding Some Code
We noted earlier that React applications take over much of the job of building the UI scaffolding. Indeed we need to supply React with only a mere stub of HTML, with most of the elements in the page being built and rendered by React itself. Open your public/index.html file and copy in the following:
<!DOCTYPE html>
<html>
    <head>
        <meta charset="UTF-8" />
        <title>Oscillator App </title>
    </head>
    <body>
        <div id="root"></div>
        <noscript>Please enable JavaScript to run this app.</noscript>
        <script src="../index.js"></script>
    </body>
</html>
React will use the root div element as the attachment point for the head of the tree of components it constructs. Notice, however, that the only JavaScript file we supply in our HTML is our index.js in a script tag. We will come back to this in the next section, on bundling our project, but just know that this file will serve as the ‘entry point’ for our application, somewhat akin to the file containing the main() function in C++ or Java (it’s called index.js by convention, following the commonplace use of index.html for main web pages). For now let’s just continue adding some code. We won’t ask our app to do anything yet other than say ‘Hello world!’, so open your src/app.js file and copy in the following code:
import React from "react";

const App = () => {
  return (
    <h1>Hello, world!</h1>
  );
}

export default App;
Then save the following few lines into your index.js in the top level directory:
import React from "react";
import ReactDOM from "react-dom";
import App from "./src/app.js";

ReactDOM.render(<App />, document.getElementById("root"));
Parcel
An awkward aspect of JavaScript in the past was that all of one’s JavaScript source files needed to be included in the HTML header, and often in a specific order. This is not such an issue if one has only a few files, but it becomes cumbersome and tedious if a project’s files are numerous and interdependent. Modern JavaScript eliminates the need for this through the use of dedicated build tools, or ‘bundlers’. Such tools occupy a place analogous to compilers in languages like C or Java. Their output isn’t a binary executable, however, but a file containing all of a project’s JavaScript code in compressed (‘minified’ and ‘uglified’) form. Even though our app is spread over multiple source files, all we need to reference is the bundle file (our project ‘build’), which serves as the entry-point for our application. To achieve this, bundlers leverage the JavaScript module system, introduced in 2015 with EcmaScript 6 (ES6), and heavily influenced by similar systems in languages like Python, Java, etc. NodeJS already had its own module system, but ES6 introduced import and export statements, familiar from Python and other historically modular languages, into the core of the language. Our bundler follows the dependency graph formed by the chain of imports and exports distributed through our code, and compiles it into this single file. So long as we reference this file (which represents the head of this graph) in the browser, our entire application code can be made available to the browser, and ultimately the user, in one go.
A number of build tools are available for JavaScript. The most popular of these is Webpack, however for our project we will be using Parcel, which is a more streamlined tool better suited for a tiny project such as the one we are building. Parcel is also faster, and can be used out-of-the-box, with zero configuration (Webpack often calls for multiple configuration files). Since browsers do not yet support the ES6 module system (nor React’s JSX) out-of-the-box, in addition to bundling our JavaScript source it also has to be converted (or ‘transpiled’) into ES5 JavaScript, using a tool such as Babel. Happily Parcel comes with this built in, so we don’t need to worry about it (unlike Webpack, where it has to be set up and configured separately, which is not always a straightforward process).
Go ahead and install Parcel with:
npm install -g parcel-bundler
Parcel comes with a CLI (Command Line Interface) and also a development server, which will conveniently rebuild your app automatically as you edit source files. To build and run your app simply pass your index.htmlfile to Parcel at the command line:
parcel public/index.html
Then visit http://localhost:1234, and you should see your app running. If we take a look at our project folder after starting the server we will find that a new folder called dist has been created. Parcel automatically creates this folder, and uses it to store all of our project’s compiled JavaScript files and other production assets. Each time we modify our code the contents of this folder will be automatically updated.
What’s Next?
We have now come to the end of this first part of our series of tutorials. Thanks for following so far! In the second part we will be setting up the audio and rendering components of the app, and integrating some basic user interaction. We will also look in more detail at React state management, and writing functional components.